I trainer indoor non possono replicare alcuni elementi tipici dell’andare in bici all’aperto. L’aria fresca, l’essere circondati dalla natura, la sensazione di avanzamento, o il ritmo naturale della bici sotto di te. All’esterno la bici oscilla da un lato all’altro, soprattutto quando si è fuori sella, su un trainer indoor il movimento laterale è notevolmente ridotto.
Ma c’è un modo per replicarlo: con un bilanciere. E mentre potresti spendere più di € 1.000 per acquistarne di buona qualità, perché non costruirne uno tuo? Ecco le istruzioni in Inglese.
Link youtube https://youtu.be/er1hbXGL188
Ecco la mia lista della spesa:
- 1 x pavimento pannelli truciolare
- 2 x molle
- 4 molle per carichi pesanti
- 4 x cerniere
- 6 x tappi in gomma da femmina a femmina
- 1 x confezione di elastomeri di gomma (blocchi lavatrice)
- 6 x piccole sfere di gomma
- 4 x bulloni
- Viti
Ecco gli strumenti che ho usato:
- Sega circolare
- Fresa per legno
- Cacciavite a percussione
- Cacciavite
- Morsetti
- Set di chiavi
- Set angolari
- Livella
I was flipping between two designs for the central pivot, and figured I’d pick up the materials for both so I could test the differences. Either way, the design called for two sheets that could rock laterally through a central pivot.
I started by measuring up the bike on the trainer. I had settled on a design that incorporated both the trainer and front wheel. There are rocker plates that allow the front wheel to shift side to side on the floor with only the trainer on the plate, but I didn’t love that idea. With a basic ‘coffin’ shape selected I measured, marked, and cut the boards, clamping two at a time to ensure they were a perfect match.
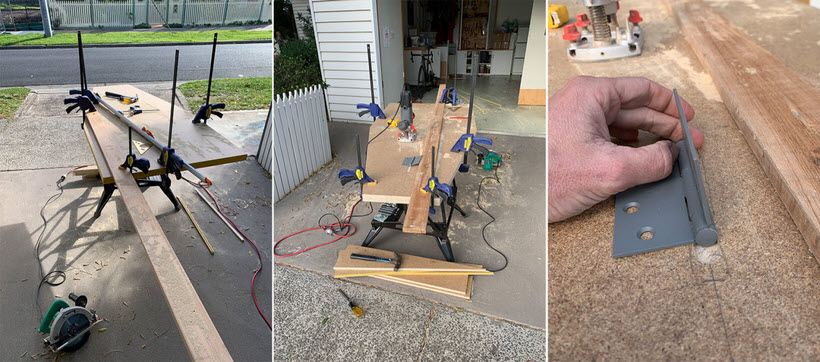
With the top and bottom board ready, I next needed to decide how to pivot them. Now that I had the materials in front of me, I felt that a central hinge would provide a solid axis point, rather than the elastomers I had seen in a couple of different designs. Given I had selected flooring as my baseplate material I was concerned that a screwed-in elastomer would put too much pressure in one spot, and might eventually pull through the board. The hinges felt like they were going to spread the load.
Next was to determine how to mount the hinges, as they would need to provide a negative angle in both directions (as opposed to a door, for example, where the hinge can only provide that in one direction). There are saloon-style hinges that allow movement in both directions, but I wasn’t sure what the load would be like – plus they were much more expensive. I considered “Z-folding” the hinges, and if I had a way of tacking them together that’s what I probably would have done, but without access to my old man’s oxy torch I figured if I kept enough clearance above the hinge pivot it would allow negative movement in both directions.
I routed a small channel to flush-mount the hinges on the underside of the board (see image above right), and then mounted the hinges at 90 degrees to a slightly raised length of 2×4. I wanted enough height to allow enough movement (plus a buffer) but wanted to keep as much of the hinge on the 2×4 timber as possible. With a cup of (decaf) tea, a bit of head-scratching, and a little jig I was able to figure it out. I tacked in the top sheet, and it all seemed to work as expected, and as expected it took my weight.
With the pivot sorted, the next step was to look at the ‘cushion’ either side. The designs I had seen for this involved anything from tennis balls, to gym balls, to pool noodles, and rubber matting. I was pretty sure that the stacked rubber feet that go under a washing machine would do the job. These composite rubber squares had enough give that I could press into them with a bit of force from my hands, so I figured with the combined weight of a trainer, bike, and body it should be the right amount.
I allowed a 15 mm gap between the stacks, and used semi-rigid stabilising springs either side to ensure that any lean was initiated by the rider. It all seemed to work as expected when standing on the board, however once riding it all felt a little sloppy, and there was too much of a pronounced ‘end’ to the cushioning on either side. While it rocked nicely out of the saddle it still felt a bit buttery, and I was definitely having to engage a bit of core strength while seated.

It was time to try the ball method. The most common type of ball I had seen was a half inflated gym ball, which allowed adjustment by inflating them to different degrees. My local store didn’t have these in stock, so I settled on some firm rubber balls – with about the same consistency and give as a squash ball. The give of these didn’t seem to be greatly affected by the air inside, so with a pilot hole drilled I installed them onto a tightened bolt. Seeing as I still had the rubber mats I used these as the ‘pads’ the ball would sit between.
I added a couple loops of inch-wide velcro to attach the arms of the trainer to the board, to ensure I didn’t tip off the platform in the middle of an enthusiastic sprint. And with a final softening of the edges with a router and some sandpaper, version two of the rocker plate was ready.
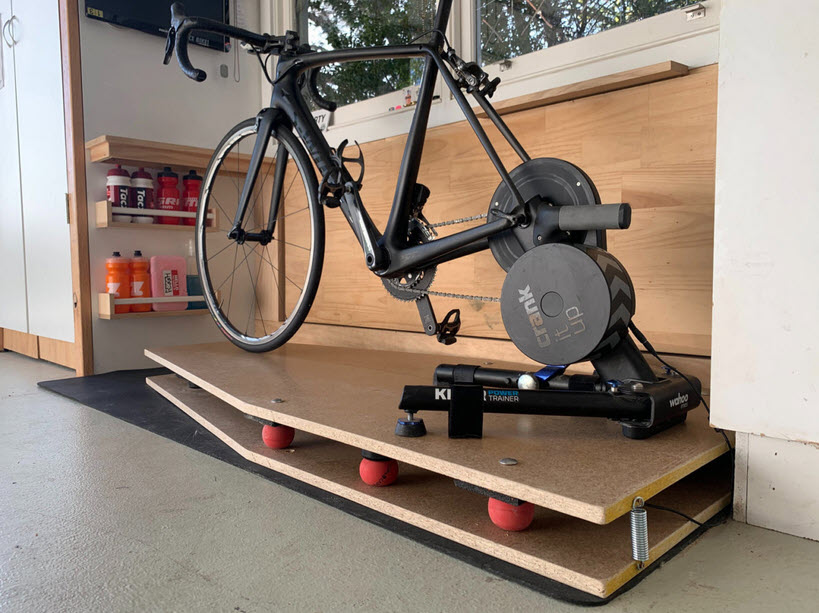
The result was a vast improvement. The addition of the rubber balls coupled with the springs cushioned the end of the most extreme movement, which meant the jarring bounce was removed. In the saddle the sway is there, but it’s subtle, and feels quite natural. Out of the saddle the smaller amount of swinging feels more lifelike and very comfortable.
For a fun weekend project it certainly ticked the boxes, and the result of this curiosity was far better than expected – to the point where I imagine it will be a permanent part of my setup. In all I spent between $60 and $80 on materials, and roughly six hours of work to pull it together.
Now that I have an understanding of the basics, I’m pretty keen to start from scratch and work on the aesthetics …
Link youtube https://youtu.be/er1hbXGL188
by Andy van Bergen